Getting started: Photograph your Stamps
In order to start using the Stamp Analyser, you will need images of the stamps that you want to analyze.
There are three ways of obtaining the images.
- Scan your stamps; simple and by far the best method, click here for the procedure;
- Photograph your stamps; tricky but doable, see below for the procedure;
- Obtain the stamp images from any website, click here for the procedure;
Photograph your stamps
Starting from version 14 of the stamp Analyser, you can use a coin or a circle template to photograph your stamps. The use of the circle template minimizes the the glare and shadow issues related to coins. If you follow the recommendations for using coins, you do not have to use the circle template.
To use the circle template, download the Circle Template by clicking here ; and then print the template on a plain white paper at actual size. The printed circle should measure Exactly Two Inches.
The procedure using the Circle Template or coins is as follows:
From the main screen, select the Circle Template or your coin from the provided list or add your coin to the list and then lock your selection by tapping the lock symbol. You have to do this once only; unless you want to change your coin.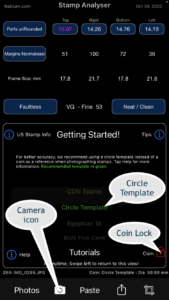
- Start the camera by selecting the “Camera Icon” from the menu of Stamp Analyser’s main screen;
- When using the circle Template place the stamp as shown in the illustration on the right and for coins shown on the left,
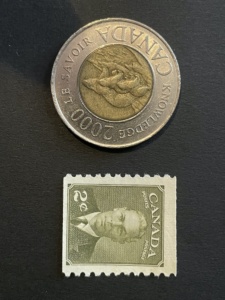
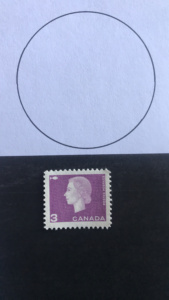
- place each stamp and the selected coin on a CLEAN black background directly under the camera lens. Important to place the coin and stamp directly under the lens to achieve better focus.
- The stamp should be lying flat and not curled-up.
- Mount the camera on a stable platform such as a tripod, a stack of books or a box will work just fine.
- The photo should be taken head-on i.e, camera parallel to the stamp; To help set up the camera head-on, the Roll and Pitch values of the iPhone/iPad are displayed. When these values reach zero and fade away; then the camera is head-on.
- For the iPhone the optimum distance from the camera to the stamp is approximately 10 cm;
- Avoid bright lights, including direct bright sunlight; Diffused light works best.
- Once you have set up the camera, run a test with a stamp of known perforations. This will ensure that you have the correct setup.
- For stamps with major cancellations or if design runs into perforations; turn stamp over.
After the photo is taken, the Stamp Analyser will automatically crop the stamp and present the results(IOS 15, version 15 of stamp analyser). In the previous versions or if the crop mode is selected, the Stamp Analyser will present a Crop View. Drag the crop rectangle around the stamp and then select “Analyse”. Check out the video on photographing stamps.