Getting Started
Before using Stamp Analyser, you need an image of the stamp you want to analyze.
There are three ways to obtain an image:
Scan Your Stamps
Scanning is the simplest and most accurate method. You can use almost any scanner, including the scanner built into most all-in-one printers.
The most important scanner setting is resolution (DPI).
For best results:
* Set the scanner to 300 DPI.
* Place the stamp on a clean black background.
* If necessary, adjust Exposure, Contrast, or Saturation after scanning.
* Do not resize the image. Resizing changes the number of pixels and invalidates the original DPI, which can affect Perforation and Frame Dimension measurements.
To save time, you can scan several stamps in one image and then crop them individually on your Mac or PC, or use Stamp Analyser’s Crop function.
Use the Photos app on your Mac to transfer scanned images to your iPhone or iPad.
Photographing Stamps
For the most accurate perforation measurements, follow these guidelines when photographing stamps.
1. Select and Lock a Coin
From the Main View, select the coin you want to use from the list.
The coin list is protected by a Lock. Tap the Lock icon to enable coin selection; the Lock turns green when unlocked.
Select your coin, then tap the Lock icon again to lock the list. The Lock turns red when the list is locked.
To change the selected coin, unlock the list, select a different coin, and lock it again.
Use the largest undamaged coin available. Avoid coins thicker than 2 mm, as they can cast shadows.
You can also add your own coin to the list:
* Tap the Coin Lock to unlock the list.
* Scroll down and select User Defined 1 or User Defined 2.
* Long-press the selected entry.
* Complete the dialogue box that appears.
Important: Take particular care when entering the coin diameter, as this value is used in all subsequent calculations.
2. Mount the Camera
Mount your iOS device on a stable surface, such as a tripod, a stack of books, or a box. Keep the camera approximately 28–30 cm (11–12 inches) above the stamp. This distance will help ensure that the image is in sharp focus.
Hold the camera directly above the stamp so that it is parallel to the surface. Adjust the camera until both the Roll and Pitch indicators reach zero and disappear. This confirms that the camera is correctly aligned.
3. Position the Stamp and Coin
Place the stamp and the selected coin on a clean black background directly beneath the camera lens.
Always position the coin above the stamp.
Zoom in so that both the stamp and coin nearly fill the screen, leaving only a small border around them.
4. Adjust the Lighting
Use soft, diffused lighting to minimize glare and shadows. Avoid direct light sources, including sunlight.
Surrounding the setup with a cut-out box can further reduce reflections and improve lighting.
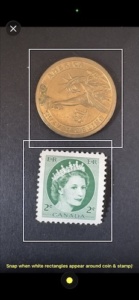
Proper lighting is achieved when white rectangles appear around both the coin and the stamp, as shown in the image below.
5. Take the Photo
When the camera is properly aligned and white rectangles appear around both the coin and the stamp, tap Snap to take the photo.
To avoid camera movement, we recommend using Voice Control.
Enable Voice Control on your iPhone, say “Tap Snap,” and then say the number displayed nearest the Snap button. This will generally be 2.
6. Photograph the Reverse, If Necessary
If the stamp has heavy cancellations or a design that extends into the perforations, turn the stamp over and photograph the back instead.
7. Verify Your Setup
Before measuring stamps, test your setup with a stamp having known perforations to confirm that the setup is correct.
Use Images from a Website
You can also use stamp images found on websites. Drag the image onto your computer and then either:
* Move it into your Photos library, or
* Drag and drop it directly into Stamp Analyser.
Important: The original DPI of a web image is normally unknown. Therefore, only the Centring measurement can be considered reliable, since it is based on relative dimensions. Perforation and Frame Dimension measurements require the original DPI to be known for accurate results.
Setup: No artificial light; excessive glare from the paper, coin, and stamp.
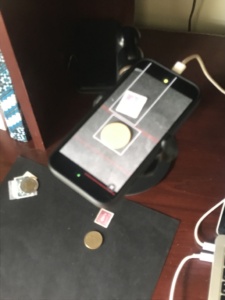
Setup: Cardboard surround minimizes glare; correct setup.
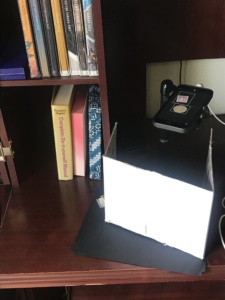
Screenshot of the correct setup, with the coin correctly placed on top. Rectangles can overlap